
Projects and units
Inventory holds everything your company sells: the projects, their phases, buildings and unit types, the price lists and payment plans, the photos and brochures, and every unit with its live status. Everyone in sales can browse projects and units, open a unit and start an offer or a reservation from it. Sales managers and company admins (by default) add and edit projects, units, prices and media. If you are a broker, the developers' projects you sell sit here too, next to any projects of your own.
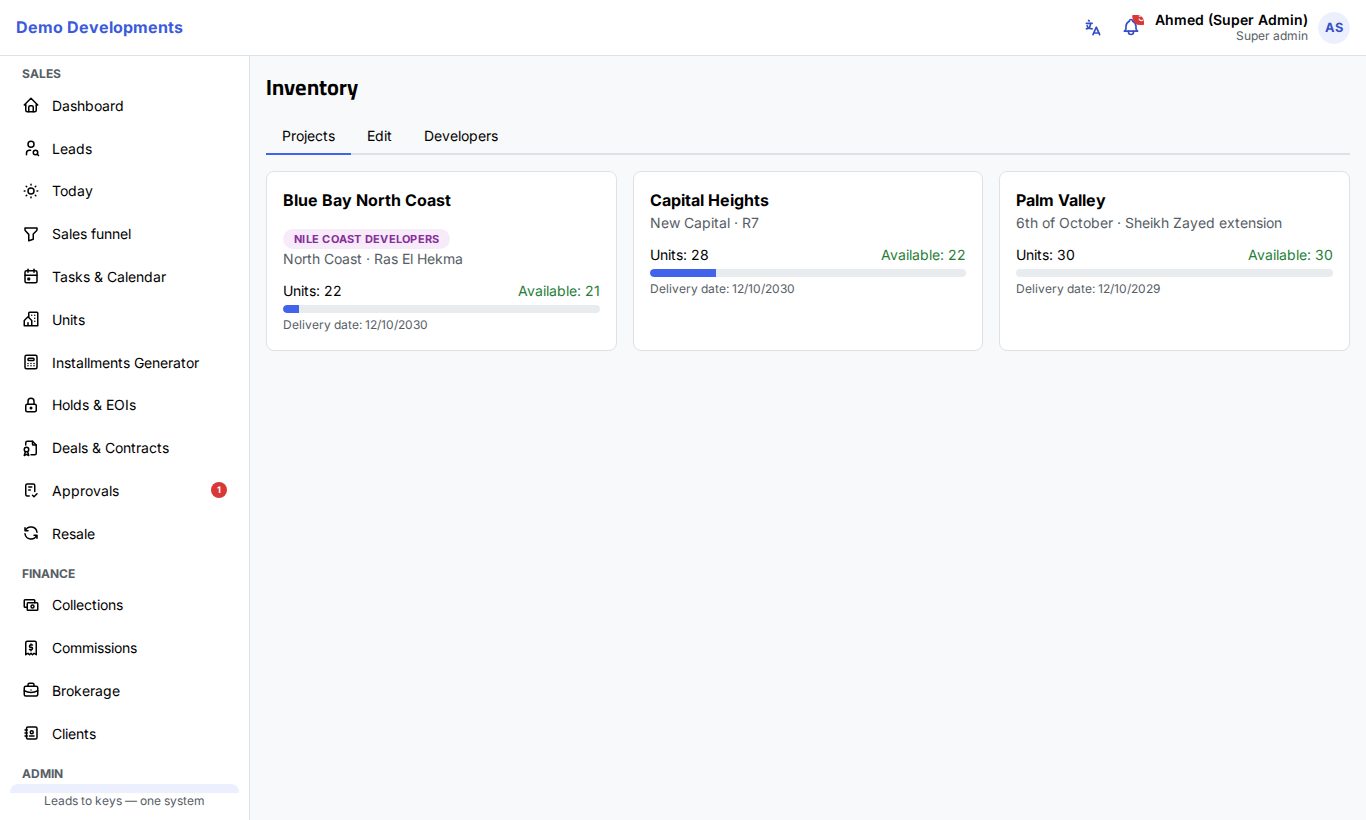
The projects page
Open Inventory in the Admin part of the menu. The page has these tabs:
| Tab | What it is for |
|---|---|
| Projects | One card per project: name, city and district, number of units, how many are Available, a bar showing how much is sold, and the delivery date. Click a card to open the project page. |
| Edit | A table to add, edit and delete projects. Only people who may edit inventory see it. |
| Developers | The developers whose projects you sell, including your own company. |
A purple badge with a developer's name on a card means the project belongs to an outside developer (one you sell as a broker). Projects of your own company show no badge.
Developers: your own and others
Before adding a project, make sure its developer exists:
- Open the Developers tab and click Add.
- Fill in Name (and Name (AR) for the Arabic name).
- Tick Our company (primary sales) if this is your own company. Leave it unticked for outside developers you sell for as a broker.
- For outside developers, set Default commission % (your commission from the developer) and Registration validity (days) (how long a client you register with this developer stays yours; 90 by default).
- Add the Contact, Phone and Email of your contact person if you like, then Save.
Add a project
- Open the Edit tab and click Add.
- Fill in Name, Developer, City, District and Delivery date.
- Check the project's rules. They come with starting values you can change:
| Field | What it does |
|---|---|
| Currency | EGP or USD. All prices in the project are in this currency. |
| Maintenance % | Added to payment schedules as the maintenance deposit (when fees are included). |
| Club fee | A fixed club membership amount added to schedules (when fees are included). |
| Resale transfer fee % | Used to work out the fee when a deal is transferred to a new owner or buyers change after signing. |
| Reservation refund window (days) | A reservation cancelled within this many days of booking (before a contract is drafted) is refunded in full. |
| Cancellation deduction % | What is kept from the money paid when a deal is cancelled outside that window. |
| Broker commission % | For outside developers' projects: your commission on this project. |
- Keep Active ticked, add a Description if you like, and click Save.
Next, open the project and set up its structure, prices and payment plans.
The project page
The top of the page shows the developer, city and delivery date, with small badges for the project's maintenance %, club fee, refund window, cancellation deduction and broker commission.
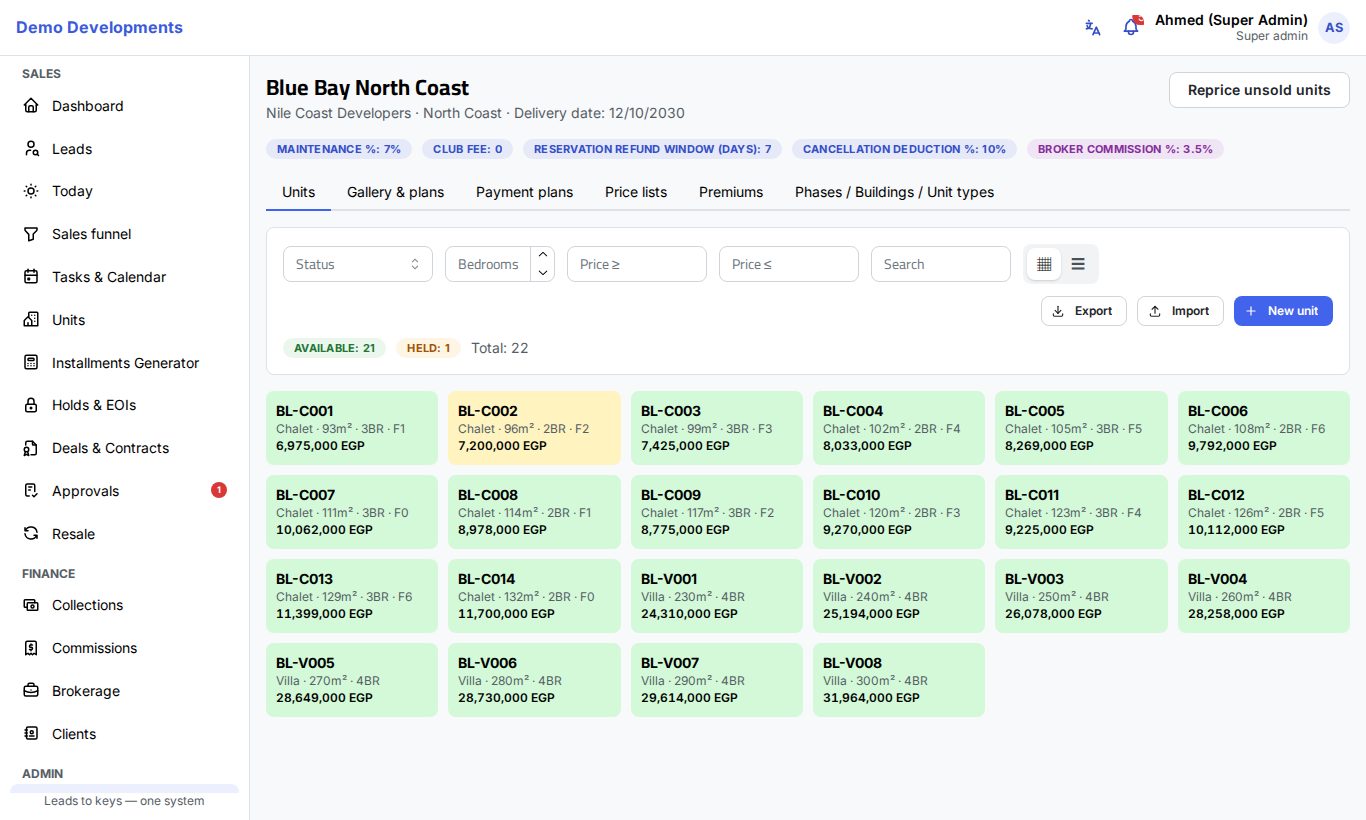
The tabs are:
- Units: the units browser for this project only.
- Gallery & plans: photos, PDF plans and brochures, and a 3D model.
- Payment plans: the standard plans offered on this project.
- Price lists: the price per square metre for each unit type.
- Premiums: extra charges for floor, view, corner, garden or roof.
- Phases / Buildings / Unit types: the project's structure.
People who may edit inventory also see Reprice unsold units at the top.
Phases, buildings and unit types
Set these up first: price lists and units need the unit types, and units can be linked to a phase and a building.
- Open the Phases / Buildings / Unit types tab. It has three lists side by side.
- Phases: click Add, type the Name and, if known, the Launch and Delivery date. A unit with no delivery date of its own takes its phase's delivery date, and otherwise the project's.
- Buildings: add each building with its Name and number of floors.
- Unit types: add each type (for example "Apartment 3BR", "Villa") with a Name and Name (AR).
Price lists
A unit's price is worked out from the active price list of its unit type:
built-up area × Price / m² + garden area × Garden / m² + roof area × Roof / m², then premiums are added, and the total is rounded to the nearest 1,000.
To add a price list:
- Open the Price lists tab and click Add.
- Type a Name (for example "Launch prices").
- Choose the Phases it applies to, or leave it empty for the whole project.
- Pick the Effective from date.
- For every unit type, fill in Price / m², Garden / m² and Roof / m² (use 0 where it does not apply), then Save.
- Click Activate & reprice on the new list. It becomes the active list (marked Active) and the prices of all unsold units are recalculated straight away.
Only one list is active per phase (or for the whole project). A phase's own active list wins over the project-wide list.
Premiums
Premiums raise the price of units with something extra.
- Open the Premiums tab and click Add.
- Give it a Name and choose the Type:
- Floor: units on floors from Floor from to Floor to.
- View: units whose View matches the View value you type (for example "Sea").
- Corner: units marked Corner.
- Garden: units that have a garden.
- Roof: units that have a roof.
- Tick Percent? to add a percentage of the base price, or untick it to add a fixed amount, and fill in Value. Click Save.
- Click Reprice unsold units so the change reaches the units.
Payment plans
Payment plans are the standard plans your sales team offers on this project. They appear in the Installments Generator and when creating a deal.
- Open the Payment plans tab and click Add.
- Fill in:
- Name, for example "10% down, 7 years".
- Down payment % and Years (0 to 20).
- Frequency: Monthly, Quarterly, Semi-annual or Annual.
- Discount %: a discount that comes with this plan (for example a cash plan).
- Delivery payment % and Delivery after (months): a payment due at delivery. Leave the months empty to use the delivery date.
- To add yearly or one-off payments, click Add under Extra / lump payments and fill in Label, %, Month (counted from the start), Repeat every (months) and Count. For example 5% at month 12, repeated every 12 months, 4 times.
- Keep Active ticked and click Save.
The down payment, delivery payment and extra payments together cannot be more than 100%. The rest of the price is spread over the installments. Untick Active to stop offering a plan on new reservations without deleting it.
Gallery & plans
The Gallery & plans tab keeps the project's marketing material in one place, so agents can show it to a client from a computer or a phone:
| Part | Files |
|---|---|
| Gallery | JPG, PNG or WebP photos, up to 15 MB each. Click a photo to view it full screen and move with the arrows. |
| Plans & brochures | PDF files up to 50 MB each (master plan, floor plans, brochure). The selected PDF opens right on the page; Open in a new tab shows it alone. |
| 3D model | A GLB file up to 100 MB. Drag to turn it, scroll or pinch to zoom. On a phone, the AR button places the model in the room. |
Everyone can view and download the files. People who may edit inventory click Upload (several photos or PDFs at a time), and can rename or delete a file with the buttons next to its name.
The units browser
Open Units in the Sales part of the menu to see the units of all projects, or the Units tab of a project page for one project.
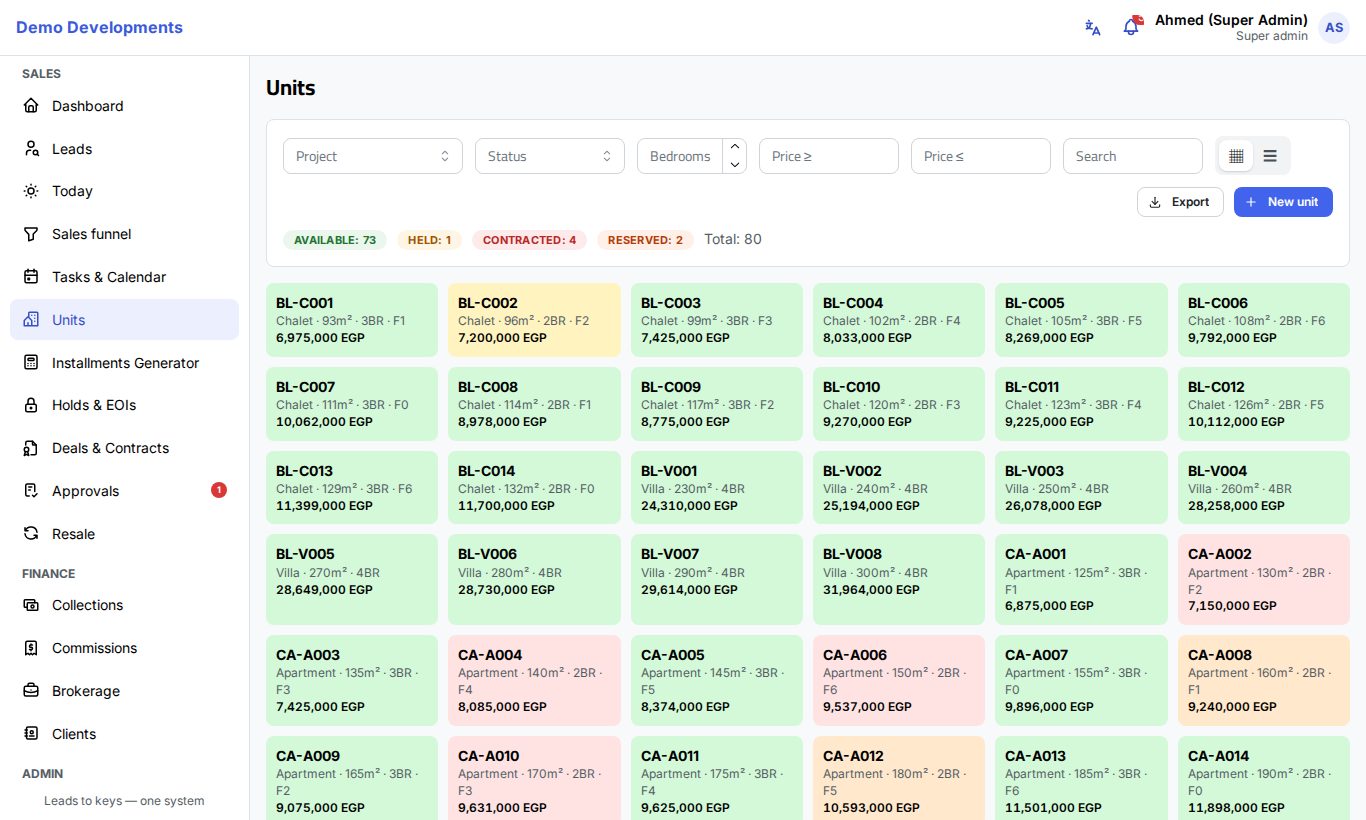
Find units
- Narrow the list with Project (on the Units page), Status, Bedrooms, a price range (Price ≥ and Price ≤) and Search (unit code).
- Under the filters, a badge for each status shows how many units match, with the Total. Click a badge to show only that status.
- Switch between the grid (▦) and the table (☰) with the toggle. The table adds the project, type, floor, areas, view and your company's own unit fields.
- Click Export to download the units you are looking at as an Excel file.
The browser shows 200 units per page; use the page numbers at the bottom for more.
Unit statuses and colours
In the grid each tile is coloured by its status:
| Colour | Status | Meaning |
|---|---|---|
| Green | Available | Free to offer, hold or reserve. |
| Yellow | Held | Held for a client for a few hours. See Holds & EOIs. |
| Orange | Reserved | A deal was made on it and it is waiting for its contract. |
| Red | Contracted | The contract is signed. |
| Grey | Blocked | Taken off sale by the company. |
| Teal | Handed over | Delivered to the buyer. |
Unit details
Click a unit to open its details on the side:
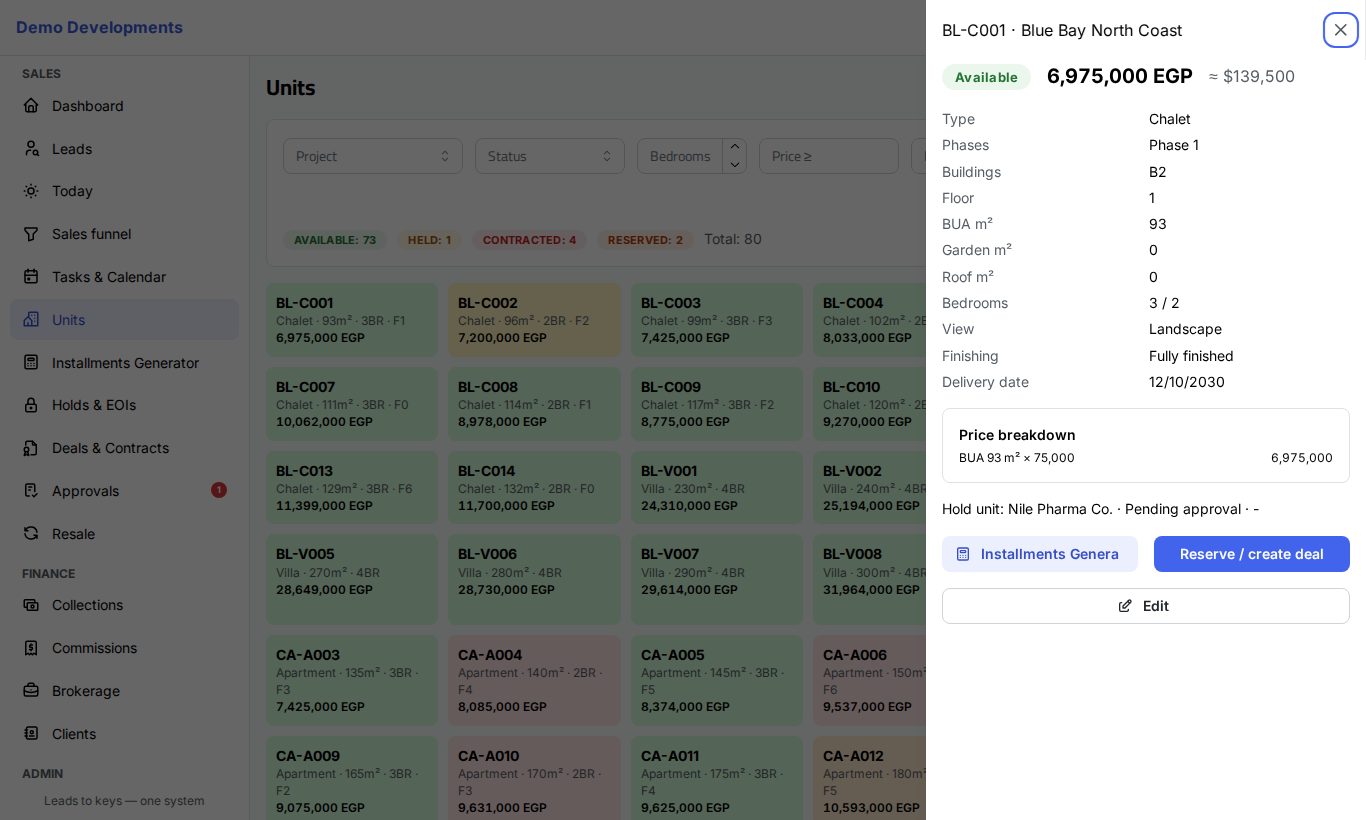
- The status, the price (and the price in USD when your company has set an exchange rate).
- Type, phase, building, floor, areas, bedrooms and bathrooms, view (and corner), finishing, delivery date and garage price if it has one.
- Price breakdown: how the price was built (area × price per m², each premium), or "Fixed price" when the unit has one.
- If the unit is reserved or contracted, a button with the deal number and client opens the deal. If it is held, a line shows who it is held for and until when.
- Installments Generator opens the calculator with this unit already chosen.
- Reserve / create deal (on available units, for people who can make reservations) opens a new reservation for this unit.
- Edit (for people who may edit inventory).
Add or edit a unit
Sales managers and admins (by default) can add and edit units.
- In the units browser click New unit, or open a unit and click Edit.
- Choose the Project, then the Unit types (required) and, if used, the Phases and Buildings.
- Type the unit Code (required), Floor, Bedrooms, Bathrooms, BUA m², Garden m² and Roof m².
- Add the View, Finishing and, if it differs from the project's, the Delivery date.
- Tick Corner or Garage if they apply. A garage needs a Garage price.
- To ignore the price list for this unit, type a Fixed price (overrides price list).
- When editing, you can set the Status to Blocked to take the unit off sale, or back to Available.
- Fill in your company's own unit fields, if any, and click Save.
The price is recalculated when you save, from the active price list and premiums (or the fixed price).
Import units from Excel
To add many units at once, import them from an Excel file:
- In the units browser, choose the Project (or open the project's Units tab).
- Click Import. The Import data page opens with Units and the project already chosen.
- Follow the steps there: download the template, fill it in, upload it and check the preview.
People who may import units can also start from Import data in the menu. See Importing from Excel.
Good to know
- Reprice unsold units and Activate & reprice only change units that are Available, Held or Blocked. Reserved, contracted and handed-over units keep the price of their deal.
- Editing a reserved or contracted unit does not change its price or status.
- A unit with no matching price list item and no fixed price keeps its current price.
- A unit's status changes by itself as you work: a hold makes it Held, a reservation Reserved, the company's signature Contracted, a completed handover Handed over, and a cancelled deal or expired hold makes it Available again. You can only set Available or Blocked yourself.