
Customisation
Every company sells a little differently. On Settings → Customisation, company admins can give the funnel stages your own names, add your own steps between stages, adapt the lost reasons, add your own fields to leads, clients, units and deals, and choose how document numbers look. Changes apply to everyone in the company straight away.
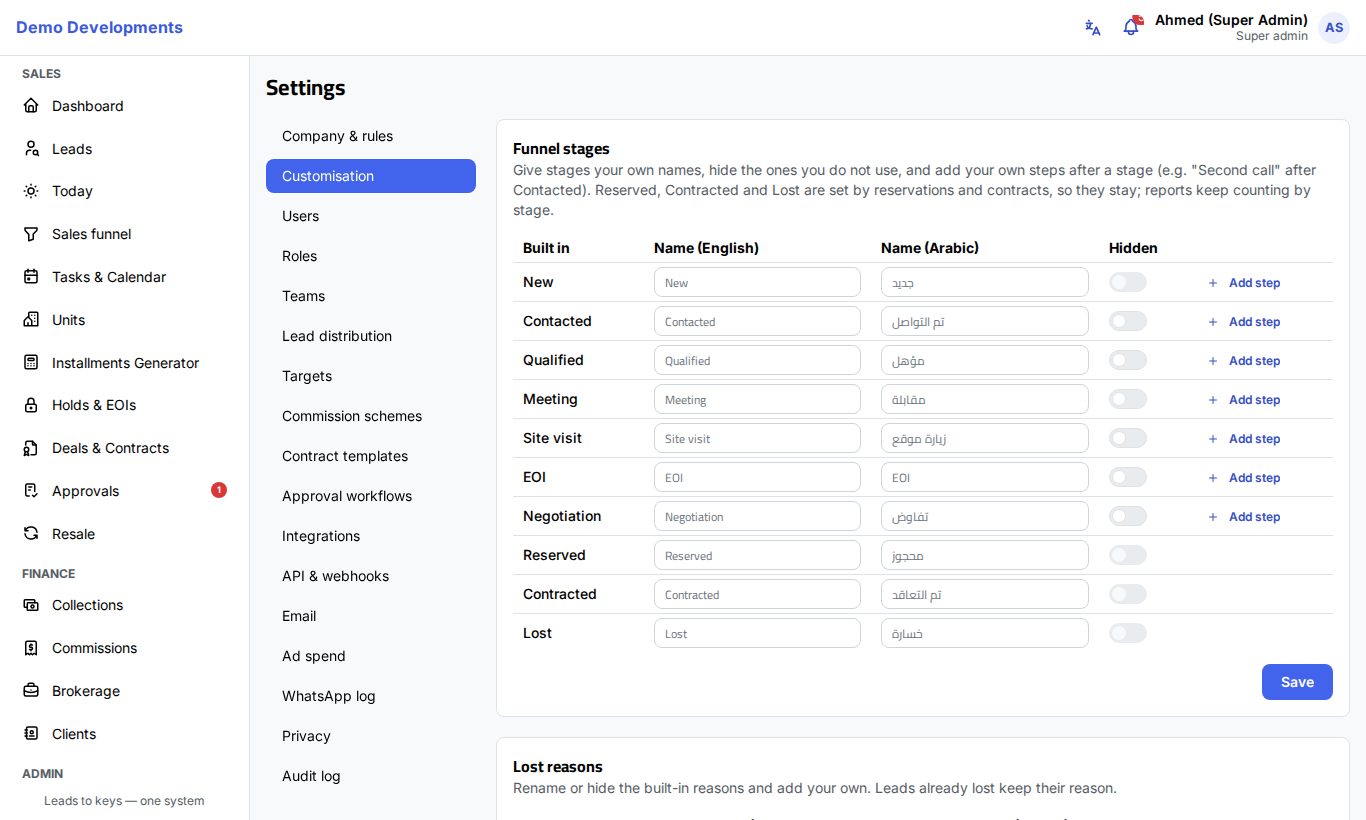
Funnel stages
The Funnel stages card lists the built-in stages (New, Contacted, Qualified, Meeting, Site visit, EOI, Negotiation, Reserved, Contracted, Lost).
Rename or hide a stage
- Next to a stage, type your own name in Name (English) and Name (Arabic). Leave a box empty to keep the built-in name.
- Switch on Hidden for stages you do not use.
- Click Save under the card.
Your names appear everywhere: on the leads list, the lead page, the funnel board and in reports.
Stages that always stay
New, Reserved, Contracted and Lost cannot be hidden: holds, reservations, contracts and lost leads depend on them. You also cannot hide a stage while leads are in it; move those leads first.
Add your own step
A step is a finer stage inside a built-in stage, for example "Second call" after Contacted, or "Waiting for documents" after Negotiation.
- Click Add step on the row of the stage the step belongs to. Steps can be added after New, Contacted, Qualified, Meeting, Site visit, EOI and Negotiation.
- Fill in Name (English) and Name (Arabic).
- Set the Order if the stage has more than one step.
- Click Save.
The step appears under its stage with the number of leads in it. A lead in a step still counts as being at that stage for holds, automation and reports; the funnel board and the lead page show the step.
To change a step, click its edit button. Switching off In use moves its leads back to the stage. The delete button removes the step; its leads stay in the stage. A step that has leads cannot be moved to another stage: add a new step instead.
Lost reasons
The Lost reasons card works the same way for the reasons agents choose when a lead is lost (Price, Location, Competitor, No answer, and so on):
- Type your own names, or switch on Hidden for reasons you do not use, then click Save.
- To add a reason of your own, click Add reason, fill in both names and click Save. Your own reasons are marked Own.
Leads that were already lost keep their reason. Switching off In use on one of your own reasons only removes it from the choices.
Your own fields
The Own fields card adds the fields your company needs, for example "Preferred floor" on leads or "Parking number" on units. Choose the record type at the top: Leads, Clients, Units or Deals.
Add a field
- Choose the record type, then click Add field.
- Fill in Name (English) and Name (Arabic).
- Check the Code. It is made from the English name; you can change it now, but not later. It is used in Excel files and to store the values, so keep it short, for example
preferred_floor(small letters, digits and_, starting with a letter). - Choose the Type: Text, Number, Date, Dropdown, Multiple choice or Yes / no.
- For Dropdown and Multiple choice, fill in the Choices in English and Arabic (at least two). Use Add choice for more.
- Tick what you need:
- Required: must be filled in on the forms. Imports and integrations may still leave it empty.
- List column: shown as a column in the list.
- Filter: can be used to filter the list (only for Dropdown and Yes / no).
- Set the Order and click Save.
The field then appears on the forms and pages of that record type, and comes with the Excel export and the Excel import.
Change or switch off a field
Click the edit button next to the field. You can change its names, choices, ticks and order. The record type, Code and Type stay as created, because the values already saved depend on them. Saved choices cannot be removed (records may use them); rename them instead.
To stop using a field, switch off In use. The field is hidden and the values already entered are kept.
Document numbers
The Document numbers card decides how new Deal, Contract, Receipt and EOI receipt numbers look:
- Prefix: letters at the start (up to 10). Each document needs its own prefix.
- Digits: how many digits the counter has (3 to 8).
- Year in number: adds the year.
- Restart each year: the counter starts again at 1 every year (only with the year in the number).
- Next number: a preview of the next number with these settings.
Click Save under the card. Numbers already given never change. The year follows your company's time zone (see Company settings).
Good to know
- Everyone in the company sees your names, steps and fields; only company admins can change them.
- Reports keep counting by the built-in stages, so renaming a stage does not break your figures.
- At most 40 own fields per record type.
- Every change on this page is recorded in the audit log.
Tip
Set up your own fields before you import your existing data, so the import can fill them from your Excel columns.